28 Oct 2016

2 projects finished in one evening!

WOOT! WOOT!

I didn't have much to do on the Petrol Station so that was a quick job to finish. I think that I'd probably preferred to have put a bit more white on the body of the building in hindsight but overall I'm fairly pleased with it.


Lovely kit to put together and to paint. A ridiculously well price kit at that!

I still had plenty of time last night after that and I decided to start on some of the bits that I need to finish to progress the scrapyard and town sets. The resin fences were next and I managed to get them finished in one sitting. I'll have to give them a lick of varnish but the painting is all done. Three different browns dry-brushed all over each of the fence sections and then the verges were treated to a two tone green dry-brush.


Not the most spectacular of projects but all important for what I'm aiming for with the scrapyard.

Next? Well I really should try and get the base boards for the town and scrapyard cut and prepped. This should also given me off-cuts from the plastic that I can dress up and use as the dock side edging. I'm quite looking forward to making these boards as the plastic is soft enough to etch into easily and this means that the pavement edges will be simple to do but should look pretty cool once painted and dry-brushed.

I'm hoping to add a few small points of interest to each piece by etching broken flag stones, drains and manhole covers which I hope will add to the flavour once all this is brought together on the table.

TTFN!


26 Oct 2016

Readying the next tranche

I'm coming to the end of the first set of buildings for my town and I'm of a mind to try and get one of my planned scenery sets pushed to completion.

I seem to be working on elements from my town and the scrapyard and also the docks at the same time. In fairness the Scrapyard and Docks are really just add-ons for the town but I don't seem to quite be close on any of the sets. I had a tot up and I think I've got in excess of one hundred hours worth of stuff to finish all three.

My thoughts turn to how I can get the most on to the table in the quickest time. Seeing I already have several good size buildings for the town it will be usable but limited so I'm playing with the idea that I should finish the scrapyard, with only twenty(ish) hours of work required to get it to a playable state.

Those twenty hours will involve making a base board for the scrapyard and painting the fence, site office and caravan. There's obviously more stuff that I want to add to the set but that will suffice to get it sizable enough to use with the town to fill a 3x3 table. With that in mind I decided to use today's clement weather to get some spraying done to get some of the next bits ready for painting.


One lunchtime spray-a-thon and I've got the stuff to finish the scrapyard undercoated along with some other bits and bobs for the docks and town.

I'll also need to make some pavement baseboards for the town and a forecourt for the petrol station but I can do that at the same time as the scrapyard board. Not planning anything especially time consuming there.

The Petrol Station itself is almost complete. Just need to do a couple of last bits like the window frames. Should be finished tomorrow night.


I would do it tonight but the Empire are threatening one of our bases so the X-Wings are being prepped for launch.

If there is another good days weather I should get the chance to spray the fire station, the brownstone apartment and the ship which is now complete.


TTFN

25 Oct 2016

Progress from the weekend

I haven't rested upon my laurels this weekend but I was more involved with getting things built than painted. The Fire Station from TTCombat has been eye-balling me from the shelf in my study and I finally caved in on Friday night and put it together.

As with most of the TTCombat kits I've made so far, this one proved easy to build. The main body of the building went up within two hours with the windows fitted. On Saturday the grey card trimmings went on with equal ease.

It is huge.


I'm looking forward to painting it but can't quite decide if I want to do the brickwork in a sandstone colour with red upper walls or pale walls with red brick detail and trim. The Red brick would fit with the buildings so far and would be nice and colourful so I suspect I'll go for that.

I have to add that there was a cutting error on one section of the kit that I reported but then I discovered they'd actually included a whole spare sheet to address it. The really impressive bit was that I sent the message at 21.48 on a Friday night and got a response within about 15 minutes checking if I needed replacement parts. Good Service!!

After that I got back to painting the Petrol Station. I've dry-brushed all that I can now including some colour on the outside and I've come to the slow part of painting in all the etched lettering. On the most part it is so crisply etched that it isn't a particularly hard job just time consuming and surprisingly enjoyable. I was expecting a mutter-fest of hasty brush swaps to correct mistakes but on the whole I kept in within the lines!


 I've also done a light floor check effect to break up the internal space.


Tonight it'll be finishing the red trim details and, if a I get time the petrol pumps which need a few bits picking out. Looking at the pictures they do need a bit more colour on the body of the pumps as well. A bit of red methinks.

I've done a bit more tinkering at work on the TTCombat container ship. A hulking model and pretty easy to construct like most of their stuff. Just the main bridge window to finish now and I'm thinking of adding something on top of the bridge like a rader.

This thing is about 75cm long. Its a WHOPPER! I haven't actually joined the two main sections together as I suspect that would be a total pig to paint as well as being a pain to store.


TTFN


20 Oct 2016

Another finished and another started.

The urban painting marathon continues.

The fast food joint got its last licks of paint. I've still got to add the counter inside and yummy looking menus and teaser posters but I've not got those yet (hint hint Urn! ;-)).


So its finished until the extra bits are sorted. On to the next one, the petrol station. I think it'll be the last for this tranche as it completes a storage box worth of buildings (apart from the Sarissa repaint) and I really do need to look at doing a few other things.

I'm going for Yellow and Red trim colours to make parts of it bright so I've dry-brushed it quite heavily. The sections that will have colour will probably have another dry-brush to lighten them even further after they've been masked off.


There is quite a lot of writing and detail to pick out so this might take a few evenings to complete.

There's been a little progress at work on the ship but not as much as I'd of liked. Dock crane added for effect.

;-)


TTFN

18 Oct 2016

Infinity Train

This is the completed model for my infinity train.  In common with most of my projects, it got 80% done really quickly, another 15% done relatively quickly after a lull..... and then the last 5% took me ages as I faffed around and didn't get on with it.  This tends to leave me with a huge pile of "nearly finished" things on my workspace as I drift between projects....

Anyway, here it is, and it's a bit of a beast....

Fully four feet long and great fun to put together and paint.  And retailing at £20 delivered from ttcombat it's a real bargain.  As it covers the length of the table, there is no need for track.
 
I decided on a Green colour for the wording and final arrows.  The train is heavily weathered as I figure a cargo train isn't going to get much cleaning.

 This is one of the power cars and you can just about see the hazard stripes that I decided it really needed to finish it off..... but of course, I didn't have any long enough, so I had to go and find an image on the internet to print onto my transfer/decal paper.  Here's a better picture:
The decal/transfer paper is one of my best purchases but it is a fair bit thinner than most commercial decals and my home printer doesn't lay the ink on as thickly so it can sometimes be a little translucent.  I think it works in this case as it shows wear and tear without me weathering it :)

 
And the thing that took the longest for me to do?  Junt suggested that each train needed it's own identifying number.... and try as I might, I couldn't shake the feeling that until I added them, it wouldn't be completed.  so here is a close up of one.... you can also see it in one of the pics above to prove each is unique......  I'm now looking forward to getting a game in on it!  Just need some cargo for it.....

17 Oct 2016

Weekend update

A fruitful weekend again. No time during the day to do anything but once the nippers are in bed it's..........PAINTING TIME!!

The fast food joint is coming along. The floors have been done now. Tiles down stairs and floorboards upstairs. The signage has also been started but needs a bit more work and tidying up.


I'm going to mix up the masking order next time I try this effect to get a less patterned outcome.

Still to add is the serving counter and its tills, Wall mounted menus and some tasty looking wall poster adverts.

I had Friday night off from the painting but didn't want to be unproductive so I got a lap tray out and made the next building on my lap whilst watching TV with the wife. Its a really nice kit and the corner grey card trim works well to hid the joining tabs and to make it just that bit more realistic looking.


Lunchtime today?

Started the massive cargo ship from TTCombat. Only got the bow together but the rest of the ship doesn't look like it will take too long as it is a fairly simple construction.


Given the size of it and the fact that it comes with several containers, this kit is really good value and well worth the money if you want to add something cool to a dock scene.

TTFN.

14 Oct 2016

Thursday night progress

I'm still plugging away at the fast food outlet. Last night I concentrated on the interior walls. I would have done more but they took effing ages.

I tend to layer up the dry brush areas from grey to ivory to white but this can take a far while and last night was no exception. I added the peachy pink as the lower part of the wall then masked off that area before painting the red dado rail thing. Then that was masked before the white was layered onto the upper wall area. This look ages and in some places it turned into stippling rather than dry-brushing in an effort to get good coverage.


I walls will have posters and menus on them to break them up even further and the kit came with a counter which I still have to do. I might also knock together a couple of tables as well. Next painting session the walls will get masked off and I'll start on the floors.


Lunchtime was quiet so I got a chance to mount the crane upon its base pylon and the opportunity to add some extra rivets to the crane. I'm looking forward to painting this!

TTFN


13 Oct 2016

Cos my mate Junt asked for it.

Fast food it is.

I only managed to get the base colours on last night and I'm of a mind to lighten the exterior walls up quite a bit. I'm also a bit undecided on how to approach the inside. The downstairs floor is going to be a stark black and white tiles but I'm not sure about the upstairs. I might try the floorboard thing again now that I've got the narrower masking tape.

I've been collating some pictures that Urn has helpfully said he would print in colour for me and I'm hoping to do some wall menus and nice foody decorations. I think I might go for a two or possibly even three tone look for the downstairs. Bright colours such as those you'd find in fast food joints. We shall see.

I want the brand colour scheme to be a KFC parody so it'll be something revolving around Red and white.


More progress hopefully tonight.

Today I put together the steam crane from Sarissa. They do cut their stuff really precisely. Went together like a dream. I just need to work out how best to attach it to the oil rig to make the dock crane.

TTFN

11 Oct 2016

Well that was quick!

Even though I did the floor effect and extra masking on the outside walls this turned out to be a pretty quick paint job from start to finish. Really enjoyed painting it.


The 1st floor isn't especially detailed so I added a little extra something with a police chalk outline to hint at the buildings nefarious history.


Ground floor pretty much unchanged since my last post but the damaged plank has been painted and the broken door stuck onto the floor.


Hmm...what next? Petrol Station or Fast food joint? I shall think on it.

TTFN


10 Oct 2016

Abandoned....

...but not unloved.

I'd thought painting the run down apartment block might have been a quick and fairly easy job but ultimately be a bit dull with drab colours. However this project has unfolded in a way that I hadn't expected. I always have a partial idea on general colours to be used before I start but I'm pretty fluid until the paint is actually applied. The red I ended up using on the walls was darker and deeper than I'd intended. This was due to the pot of terracotta I'd planned to use having all dried up!

But I am glad this has occurred as the deeper richer colour should stand out nicely among the other brick buildings whilst still being of a similar appearance.


I've picked out the etched banded detail in grey but this needs a touch more work as there are additional details that'll need hand painting to get them to show up. The removable first floor has had some drybrushed browns but was lacking something until I used a watered down sepia ink which intensified the colours that had been looking too washed out.


I suspect this is where the outline of the body and blood stain will end up being as both will show up nicely against this colour. Downstairs got the tiling treatment. I'm pretty happy with this but I think for the petrol station tiles, probably my next project, I will go for a black and white tile effect.


I still need to do the brick trim, planking on the windows, broken bits on the floors, address some of the other details and do some weathering but there really isn't that much more to be done now.

TTFN

7 Oct 2016

On to the next one.

Last night I did the tiny finishing touches on the Police station and the comic shop. Little bits like Nuln Wash on the hinges and Matt varnish to dull down certain bolder colours. That didn't that too long so I got to start on the Abandoned Apartment building. I only had a chance to do the first of the drybrusing but it was good to get it started. After a base of darkish grey I'll move onto a reddish terrcotta colour to be the main colour for the walls. I like to have more than one colour on them to help avoid large areas of flat colour that I find to be somewhat unrealistic to the eye.

Once the red is on I can mask off some of the detailing that is on the walls and pick that out in another colour. Perhaps a sandstone sort of tone to go with the red walls.  We shall see.

I've also done the grey on the interior walls but I'll lighten that up with a lighter grey tone and then perhaps something like eggshell blue.

I'd gotten all determined to try the floorboard effect on this building but I'd completely forgotten that the 1st floor on this one already has them etched on so it'll be a simple matter of a bit of dry-brushing to get the floor done. I managed to knock a door off during the dry-brushing but I'm just going to stick it to the floor once it's all painted. It should look good and derelict!


Lunchtime one again provided me with a chance to make some progress on making some of the kits I've got still to put together. This one is a little portacabin type thing that will go well with my scrapyard set. I'll also be able to drop it next to some ruin terrain as the site office for a demolition. Once again a solid, cheap little kit from TTCombat. It took me about 35 minutes from taking it our of the wrapping to completion. A very well made kit with everything cut well.


The Steam crane has been relegated to next week as I think it might take several lunchtimes to finish and I didn't want to leave it half done over the weekend.

No painting tonight. Beer and a movie instead I think.

TTFN

6 Oct 2016

I'm on a roll!!

I'm totally riding this wave of productivity at the moment and loving every minute of it!

More progress on the Comic shop last night. I haven't quite decided if I want to paint some stars on the shop sign board yet. I quite like the bold solid colour but it does feel like it should have something else.

After that it is only really weathering to finish it off so it'll soon be done. What to do after that? I need to flesh out the city a bit more and I think the quickest thing to do next would probably be the abandoned apartment build. It should only take a few nights and I am determined to do floor boards in this one and I'm even tempted to add a police chalk silhouette on one of the floors and an unpleasant dark stain on the floor. There must be a reason it is abandoned after all.

I had some birthday money recently and decided to treat myself to even more MDF!!! Oh yeah. I only ordered it from TTCombat (via Ebay) on Monday but it arrived yesterday lunchtime. Sweet! I got a brownstone building, a construction office, the new arcade and the fire station. However I must refrain from starting these until I've finished a few of my existing buildings first. Not an easy task as I am itching to start on the Fire Station.


I got round to gluing together the caravan for my scrapyard set today. I still need to texture the based before painting but that shouldn't take long. I didn't add all the awnings that come with the kit. I think it is great that the kit comes with them but it didn't really go with the look that I wanted and besides I'm not sure about the long term durability of the thinner cardboard pieces.


Tomorrow lunchtime? Steam crane I think!

TTFN

5 Oct 2016

Is it still September?

Cos I'm still plugging away at the scenery.

And loving it!

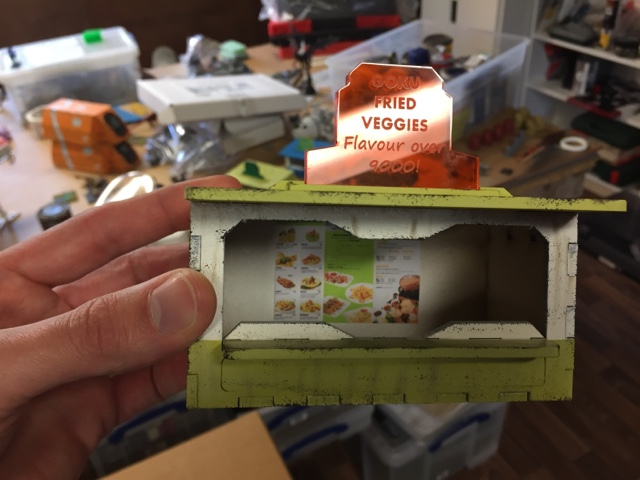
After finishing the Police Station I've started on the comic shop also from TTCombat. It's a really nice model with a cool recessed doorway. I wanted to try doing something a bit different on the floors of the TTCombat buildings and decided to try a tiled floor downstairs in the shop. This was pretty easily achieved with dry-brushing different colours and basic decorators masking tape. I think it worked out quite well.


After the success of the tiles I thought I'd try some floorboards. Again with masking tape but slightly trickier as I had to shift the masking tape around between bouts of dry-brushing to get the boards to be narrower than the masking tape. Not a bad effect but it'll be better utilising thinner masking tape which has been ordered from Ebay.


Sadly, at this point, I got cocky and decided to try and add a bit of extra pigment to bring out the floorboards. I tried to paint thin lines between some of the boards to make them stand out but it didn't work very well. Not a total write off but not something I'll do again. I didn't take a photo of it cos I was sulking. So there.

After the laborious painting of the brickwork on the police station I tried to achieve a similar effect, with different tones on the bricks, but with a lot less effort. I painted some of the bricks with the base colour and then dry brushed the colour over the rest. I think it worked okay but there is nowhere near the amount of contrast between the brick tones as I'd achieved on the police station. I like it and it takes a fraction of the time to do so it might win as the technique du jour on brickwork.The corner edging was picked out by hand as normal.


Then on to the frontage. I still need to work on the sign but the shop front was a simple matter of masking tape and dry-brushing once again. I do prefer the mottled look the dry-brushing achieves on buildings as it is less stark than blank colour. I'm looking forward to having some painting time this evening and I'm hoping to all but finish the comic shop tonight. It'll depend on how long the sign takes as the detail is quite small. I think I'm also going to pick out the window frames in a slightly different colour but I might using masking tape and dry-brushing to try and speed that up.


Work lunchtimes are still proving constructive as I've managed to put together a few bits. First up is a two Storage tank set from Warsenal.


The painted pictures of these and the rest of their range look great but I have to be honest the construction experience wasn't great. The mix of mdf and acrylic felt odd. I'm not a purist but I've got concerns as to how well the acrylic will hold paint. I'll use a proper primer so hopefully it won't be an issue. The 2mm acrylic is also quite brittle and I had several of the tank side pieces snap during construction. Not insurmountable issues but it added to the slight dissatisfaction I got from the kits. Would I buy more of their stuff? Jury is still out. I'll make my mind up after painting them.

A touch more progress on my dock crane as I've put together the pylon for the crane to rest on. I wanted this together prior to working on the crane as I'm merging two kits from different suppliers together and I want to tinker with them to get the interface between crane and pylon right. The added rivets look pretty good and should come out well with metal paint dry-brushed on and weathering added.


Finally, today I knocked together my TTCombat billboards. These two cost £3.95 post included as set from Ebay. It's on things like this that TTCombat (yes...I am quite a fan) really knock the ball out of the park. Really good characterful small scenery bits that have the potential to add a lot to your buildings and also the game all at a really good price. lovely to put together as well.


TTFN

3 Oct 2016

Infinity scenery

Well, these might not have been completed during "scenery September" but that's certainly when the bulk of the work was done.

First up, walkways from ttcombat. Great value these.
Couple of coats of white and then weathering and black sponged.
The adverts are from Antenocitis workshop bought a loooooong time ago and finally used to add some visual interest.

Next up, four fast food vendors, also from ttcombat.
My vision of infinity has lots of bright colours, but lots of weathering and a generous dose of white to try to tie it all in and not look too garish. Time will tell if it works!
Appropriate menus on the inside of each one
Would you eat somewhere as "clean" as this?

Lots more to come, hopefully soon!